A few of my favorite tips for writing Windows Phone applications end-to-end

I’m currently working on a GoodReads client for Windows Phone and while I’ve written a ton of phone code for various demos, API smoke testing, targeted “how do I” questions, etc. it’s an entirely different beast to write an application end-to-end.  The technical questions are often the easiest and if you’ve been coding for more than a few years (or months, you rockstar you) the problems and questions that keep you up at night shift from technical (“how do I save an image to the phone?”) to architectural (“what’s the best pattern for integrating a REST client into my caching framework?”).

As a knowledge and data capturing exercise I’m collecting the various articles, resources and code snippets that I found extremely helpful as I fleshed out my application, grouped by the order I came across the issues and roughly the order I architected my application.

This is a “live” document that will to continue to grow as I finish my application. Also if you’ve found articles that made a key difference in your application development let me know so I can check them out!

User Experience/UI Design

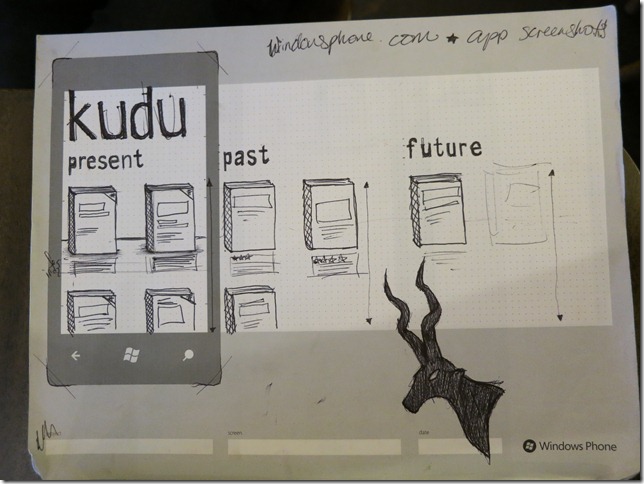
Kudu UI Sketch

Close down Visual Studio, stop building up your class library and do something that you’ve been told is anathema to good development.  Start with your UI and build out from there.  It is key you understand the layout of your application, roughly what each page will look, what functions it’ll perform, what states it can be in. Seriously. I crafted this lovely rich client that modeled my entire backend in a clean, crisp way and then I threw it all away.  Why? Because when I started mapping the client to my UI I was making 3 or 4 calls to the backend when if I’d just understand HOW I’d be displaying it I would have crafted my middle-layer differently.  It’s one of the dirty secrets of creating lean and mean apps, you do end up building you middle-tier to optimize for the end result, not as some model that has been delivered from high on top.

  • When you need a little more structure than just a piece of blank paper try the Windows Phone Sketch Pad from UI Stencils.  I love this sketch pad and it helped me a ton in crafting my UI and work flow.
  • Make sure you’re familiar with the User Experience Design Guidelines for Windows Phone over on MSDN as you start thinking about your application.
  • The Windows 7 Snipping Tool.  It’s already on your machine (you are running Win7 right?) and I use it about a dozen times a day to screen grab my current page and drop it into Paint.NET to take pixel measurements to make sure my UI is as close Metro design guidelines as possible.

Architecture

  • You’ll need to think about caching if you deal with any significant amount of data and on a mobile device that pretty much means any data at all.  I’m using Shawn Burke’s excellent web request data caching framework AgFx.
  • I am using a form of MVVM but I haven’t jumped on board with either Prism or MVVM Light, mostly because I’m a nerd and I don’t trust anyone else’s code until I’ve written my own framework, formed my own opinion of how things should be done and then adopt the one that I best align with.

Login/Authentication

A great number of applications are skins over some backend that requires a login and these days there is a good chance it’s via OAuth.  It’s actually not that hard but it can be a huge in the arse to debug and get just right as each back-end does things just slightly differently.  Here are the articles that helped me along:

  • From my colleague Sam Jarawan I cribbed a bunch of code from his article, “Building a ‘real’ Windows Phone 7 Twitter App Part 2 – oAuth
  • I used both excellent .NET REST helper libs Hammock & RestSharp.  I ran into some issues with params with square brackets using Hammock so had to switch to RestSharp but I honestly couldn’t find any major different between the two to recommend one over the other.  RestSharp seems to have a slightly more active community and docs.
  • A lot of apps simply won’t work if you don’t log in so you want to conditionally show a login page based on some state.  For that turn to Peter Torr’s blog post, “Redirecting an initial navigation”.

Certification

Tools

My supporting cast of tools.

  • Git - Whether you’re a lone wolf, a pack of one, coding the next great thing or a corporate developer you need to version control. If you’re in a company you probably already have a solution but if you’re a coffee shop coder you may not be using anything and that my friend is a mistake. You’ll get on a caffeine buzz and decide to refactor your entire application only to get distracted and find your app in pieces wishing you could just get back to how everything was pre-latté. There are a ton of great source control systems but lately I’ve been using git like all the cool kids. To do local versioning is a snap, without the need for a server or service running. I also still love Subversion and the server I put in place at my last job is still rocking along being a source control hero.
  • Dropbox – I code on three different machines and Dropbox makes it possible for me not to worry if I have the latest source for my project. Best of all it works well with my source control so I get portability as well as versioning.
Recreating the Windows Phone 7 message “bubble” style in Silverlight

In a little app I’m working on to exercise some new Mango features I needed to create the message “bubble” and oddly enough didn’t stumble across any samples I could easily use even though a large number of apps have recreated this style, most likely because it’s so easy to do.

image

Here was my first take and it’s very hard-coded to the above look but it should be trivial to change it around.  Also there are dozen ways you could make this more reusable, either as a template for a ContentControl or as a new control.  If anyone has any suggestions for improvements or a better resource I’d love to see it!

XAML

<!-- bubble -->
<Grid Grid.Column="1"
		Margin="12,6,12,0">
	<Grid.RowDefinitions>
		<RowDefinition Height="Auto" />
		<RowDefinition Height="Auto" />
	</Grid.RowDefinitions>
	<Path Data="M 16,12 16,0 0,12"
			Fill="{StaticResource PhoneAccentBrush}"
			HorizontalAlignment="Right"
			Margin="0,0,12,0"
			UseLayoutRounding="False"
			VerticalAlignment="Top" />
	<!-- Your actual content here -->
	<StackPanel Grid.Row="1"
				Background="{StaticResource PhoneAccentBrush}">
		<TextBlock Text="{Binding Mood}"
					Style="{StaticResource PhoneTextNormalStyle}"
					FontWeight="Bold"
					TextWrapping="Wrap"
					Margin="6,12,6,6"
					HorizontalAlignment="Left"
					VerticalAlignment="Top" />
		<TextBlock Text="{Binding LastUpdated, StringFormat='g'}"
					HorizontalAlignment="Right"
					VerticalAlignment="Top"
					Margin="6,0,6,6"
					Style="{StaticResource PhoneTextSubtleStyle}"
					FontFamily="Segoe WP SemiLight" />
	</StackPanel>
</Grid>

Note for the sharp-eyed I’m using a feature that is new for Mango that exists in Silverlight 4 which is default string formatting in bindings.

Extension method to get a page’s ProgressIndicator

In Mango we added the ability to interact with the shell’s native progress indicator along the top of the page.  This is a great way to maintain UI consistency with the phone as well as get a smooth progress animation because the system is handling the animation vs. the Silverlight runtime.  Here I’m recreating the ‘save to phone’ menu item you can see in the pictures hub by adding a “Saving picture…” progress indicator:

image

There are some great articles on using the new ProgressIndicator out there and I won’t do yet another intro blog post but I did want to share a little extension method I wrote to grab it from the page and avoid some of the annoying initialization code that you end up writing over and over again.

Some of my favorite ProgressIndicator articles so far for those looking to explore this in more depth are:

And here is my little extension method I’ve found useful on a few pages:

public static class Extensions
{
    public static ProgressIndicator GetProgressIndicator(this PhoneApplicationPage page)
    {
        var progressIndicator = SystemTray.ProgressIndicator;
        if (progressIndicator == null)
        {
            progressIndicator = new ProgressIndicator();
            SystemTray.SetProgressIndicator(page, progressIndicator);
        }
        return progressIndicator;
    }
}

I’m playing with using some of the various code snippet websites out there and this is embedded from Smipple. I’d love to see more Windows Phone snippets pop up on these sites.

UPDATE: Scratch the idea of embedding Smipple snippets via embed code, it looks awesome but seems to tweak my formatting, going back to good old syntax highlighted.

What’s New for Windows Phone Development with Silverlight (in Mango) - MIX11 Session Online

My talk from MIX11 has made its way online and for those that couldn’t attend (or those that were still recovering from the great attendee party and discovered that 9am is way too early to attempt to move) a video of my session is online over only channel9 available for streaming or downloading.

Channel9: What’s New for Windows Phone Development with Silverlight?

Also for your direct viewing pleasure here it is embedded.

For anyone that watches it and has questions, or people in the audience that didn’t get a chance to ask one feel free to drop me a line in the comments and I’ll do the best I can to find you the answers.

Also because not everyone had time to fill out their speaker evals if there is a type of content or way you’d like to see this content delivered in the future I’d love to hear your feedback in general.  More or less code? More technical details, would you prefer to see flashy demos that rock but require a lot of code or more simple demos that clearly show the feature?

MIX is for you so anything we can do to help improve content is greatly appreciated.

Crazy Coincidental Coding, Batman!

My Windows Phone cohort and all-round good guy Peter Torr posted on exactly the same topic that I did at almost exactly the same time… and we didn’t co-ordinate it at all!

http://blogs.msdn.com/b/ptorr/archive/2010/08/16/virtualizing-data-in-windows-phone-7-silverlight-applications.aspx

Creepy, huh?

Peter has a great overview of virtualization and shows a different sample and given how tricky virtualization can be I highly recommend you also read his article.

Improving ListBox Performance in Silverlight for Windows Phone 7: Data Virtualization

There is a lot of data out there; on the the internet, tucked away in databases, sitting patiently on the other side of a REST web service just waiting to pounce on your unsuspecting Windows Phone application that just wants to display a little slice of it all so people can read it, touch it and generally make sense of it.  The problem is there is a lot of it, so what is a poor unsuspecting application to do, especially when it’s been crammed into a form factor that doesn’t allow ever expanding memory upgrades?

In this post and a few to come I’m going to explore the various ways you can work with the ListBox (the go-to control for displaying lists of data) in your application to keep it speedy and responsive.  Today we’re going to start with a feature added in Silverlight for Windows Phone: Data Virtualization.

Data Virtualization

Data virtualization is the concept of only loading “just enough” data to fill out your UI and be useful to interact with.  This is particularly useful if your data set is large and can’t all fit into memory at the same time.  Good examples are the 3,000 images you took of various pancakes shaped like childhood cartoon characters or all 23,083 remixes of The Postal Services “The District Sleeps Alone Tonight” you have loaded up on your phone.

Data virtualization in Silverlight is accomplished when you bind a custom IList implementation to a ListBox with a data template.  Let’s break that statement down by creating a very naïve virtualized list that simulates a list of 10,000 song objects.

Implement IList

This isn’t as daunting as it might seem, there are really only two methods you need to implement: Count and the indexer property.  Everything else can throw NotImplemented.  Count returns, well, the count of items while the indexer returns the actual item being requested by index.

Most of the magic happens in the indexer.  When an item is requested you now have a chance to go off and grab your data, fabricate it (such as using a WriteableBitmap), load it from IsolatedStorage, compute it based on index or generally return whatever makes sense.

Here I’m just creating a new Song class and setting its Title to a string that matches the requested index but in reality you’d be doing some parsing/loading/fetching here.

public class Song
{
    public string Title { get; set; }
    public string Length { get; set; }
}
public class VirtualSongList : IList<string>, IList
{
    /// <summary>
    /// Return the total number of items in your list.
    /// </summary>
    public int Count
    {
        get
        {
            return 10000;
        }
    }
    object IList.this[int index]
    {
        get
        {
            // here is where the magic happens, create/load your data on the fly.
            Debug.WriteLine("Requsted item " + index.ToString());
            return new Song() { Title = "Song " + index.ToString() };
        }
        set
        {
            throw new NotImplementedException();
        }
    }
    // everything else throws NotImplemented Exception.
    // .
    // .
    // .
}

NOTE: While the code is rather easy to implement it’s boring, mind numbingly boring so I’ve made the above implementation available for your source downloading pleasure.

Bind to ListBox

This is pretty straight-forward stuff, you’ll need to bind your new fancy list to the ListBox in question.

// Constructor
public MainPage()
{
    InitializeComponent();
    ItemList.ItemsSource = new VirtualSongList();
}

DataTemplate

One caveat is your ListBox needs to use a DataTemplate otherwise virtualization doesn’t kick in.  The virtualization code-path needs to make a few assumptions about your data and having a DataTemplate helps it down that path.  Without it all your hard work will go down the drain as the first time you bind your list every single item will be requested.

<ListBox x:Name="ItemList">
    <ListBox.ItemTemplate>
        <DataTemplate>
            <TextBlock Text="{Binding Title}" FontSize="32" />
	</DataTemplate>
    </ListBox.ItemTemplate>
</ListBox>

In Action

Let’s take this code for a spin.  An F5 and emulator launch later and we’re looking at this pretty screen:

image

As you can see we’re using the Song created during the indexer call.  To prove it’s actually virtualized I added a Debug.WriteLine to output every time an item was requested:

image

As you can see only 52 items were requested instead of the full 10,000.  Why 52 instead of just 13?  You always want a few items as buffer to give your virtualizing code a chance to actually do the work while items are being scrolled into view.  For this reason we request about three page worth of data so your UI is always responsive.

Extending And Testing

A virtualized list that only returns 10,000 items is a bit limited.  A better, more testable pattern would be to create a separate repository or “creator” class that actually creates, counts and manages the objects.  Your list should be nothing but that, a list.

Caching

Another thing to be aware of, and this is important to pay attention to, virtualization doesn’t do any caching for you.  This means if you scroll down and then back up your virtualized list will ask for index 0 again and if you have a naïve implementation you will recreate item 0 over and over again.   Depending on what you’re returning you may want your repository to have some kind of object cache based on either time or current index.

When To Virtualize

If you attempt to do a lot in your indexer’s get, where you actually make the “virtual” data real, you’ll soon discover that your UI is now *worse* than it was before. That’s because as you’re scrolling it’s getting hit over and over again so if you have an expensive creation you’ll block your UI thread and everything will come to a screaming to a halt (some people say screeching halt but if I can’t interact with my UI you will hear screaming).

The general rule of thumb on when to use data virtualization is for large lists or medium lists whose items are heavy weight, such as images and expensive XAML objects.  The bottom line is you just can’t have all 3,000 images loaded up at once so you need some way to give the user a feeling of a nice, continuous smooth scroll.

So how do you minimize the delay from heavy weight objects?  Stay tuned for my next blog post when I talk about using proxy (some people like to say broker) objects to push as much of the real work into the background thread.

Getting Blur And DropShadow to work in the Windows Phone Emulator

I’ve noticed a few questions in the forums around why the Blur and DropShadow effects aren’t showing up in the Windows Phone 7 Series emulator and the simple answer is you have to set CacheMode to BitmapCache.

<TextBlock Text="DropShadow" Foreground="Black" FontSize="48" CacheMode="BitmapCache">
	<TextBlock.Effect>
		<DropShadowEffect/>
	</TextBlock.Effect>
</TextBlock>
<TextBlock Text="Blur" Foreground="Black" FontSize="48" CacheMode="BitmapCache">
	<TextBlock.Effect>
    	<BlurEffect/>
	</TextBlock.Effect>
</TextBlock>

We are working on setting this automatically so you don’t have to scratch your head each time you apply an effect and wonder why it looks fine on the design surface yet doesn’t show up in the emulator.

UPDATE [7/20/2011] – I was looking through my blog and realized this needs to be updated. For anyone still looking for this information all the effects such as Blur & DropShadow were intentionally disabled from the product for both 7.0 and the upcoming Mango.  The performance hit that applications took from using these effects put too much of a strain on the system and it was decided that if we couldn’t deliver a perfomant feature we would disable until such a time as we could.

Changing the Onscreen Keyboard (SIP) in Silverlight for Windows Phone 7 (WP7) using InputScope

Given that the main way users enter text in your Windows Phone 7 Series application is via a tiny onscreen keyboard (a “Software Input Panel” or SIP) it’s in everyone’s best interest to make sure the right keys are available to the user when they need them.

A good example is when you go to enter a PIN number you really only want to see number-related keys, when composing a SMS you’d like a quick way to insert an emoticon and if writing something longer you probably want auto-correction and replacement suggestions. The good news for Windows Phone developers is you can control which SIP layout is used and which auto-correct settings are enabled by setting the InputScope property of your TextBox.

The concept of InputScope isn’t new to XAML by the way, this concept already exists in WPF and was a nice fit with the native SIP behavior so if you’ve used InputScope before you should be right at home.

Setting InputScope

There are really three ways to set InputScope, two of which are cumbersome yet provide Intellisense and a third that is easy but requires you to know exactly which InputScope you’re after.

Via XAML

Doing it this way you’ll get full Intellisense yet it’s a lot of work to set a simple property:

<TextBox>
    <TextBox.InputScope>
        <InputScope>
            <InputScopeName NameValue="Text" />
        </InputScope>
    </TextBox.InputScope>
</TextBox>

Via Code

If you’re more the code-behind sort here it is in C#:

textBox1.InputScope = new InputScope()
{
    Names = { new InputScopeName() { NameValue = InputScopeNameValue.Text } }
};

Via XAML with a TypeConvertor

Remember how in high school they’d always teach you the hard way before showing you the easy version? Guilty as charged. If you already know the exact InputScopeNameValue you want to use, for example ‘Text’, then you can take advantage of the built-in TypeConvertor that is already wired up to the property and write this much easier XAML:

<TextBox InputScope="Text" />

InputScope Example Application

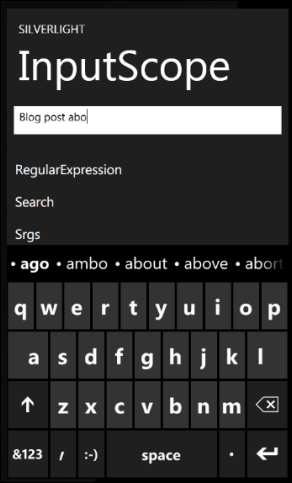
When we were bringing InputScopes from WPF to Silverlight for Windows Phone I wrote a quick app to show all the available InputScopes and automatically set the selected one on a TextBox. This gives you a feel for how many there are and what layout comes up when set. Here is what it looks like along with a link to the source:

Download the source.

InputScope Sample Application

Common InputScopes

Now that you know how to set them here are some of the more useful InputScopes:

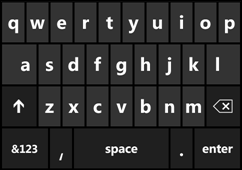
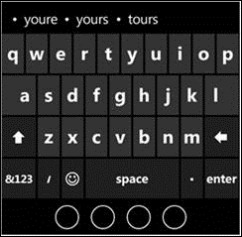
Default

This is the default InputScope when no input scope is specified. Auto-capitalize first letter of sentence. The app can show app specific text suggestions.

Layout: Standard QWERTY layout.

Default InputScope
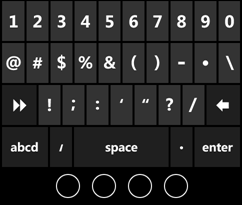
Number

When all you’re looking for is basic number entry. All features like auto-capitalize are turned off.

Layout: the first symbol page of the standard QWERTY layout.

Number InputScope
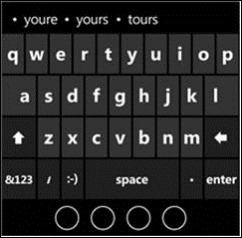
Text

When the user is typing standard text and can benefit from the full range of typing intelligence features:

  • Text suggestions (while typing and when tapping on a word)
  • Auto-correction
  • Auto-Apostrophe (English)
  • Auto-Accent
  • Auto-capitalize first letter of sentence

Layout: Text layout and access to letters, numbers, symbols and ASCII based emoticons + text suggestions.

Example fields: email subject and body, OneNote notes, appointment subject and notes, Word document, etc.

Text InputScope
Chat

The user is expected to type text using standard words as well as slang and abbreviations and can benefit from some of the typing intelligence features:

  • Text suggestions (while typing and when tapping on a word)
  • Auto-Apostrophe (English)
  • Auto-Accent
  • Auto-capitalize first letter of sentence

Layout: Chat layout and access to letters, numbers, symbols and rich MSN like emoticons + text suggestions.

Example fields: SMS, IM, Communicator, Twitter client, Facebook client, etc.

Chat InputScope
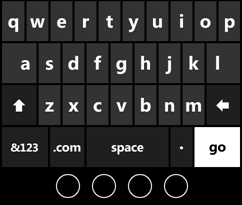
Url

The user is expected to type a URL. All auto-correct features are turned off.

Layout: Web layout with “.com” and “go” key

Url InputScope

For a complete list of InputScopes supported in Windows Phone 7 check out this MSDN link: InputScopeNameValue Enumeration.

In Conclusion

As you’re writing your applications don’t forget about InputScope, it’ll give it just that much more polish and can really make a difference in usability.

Slides + Code + Video from ‘An Introduction to Developing Applications for Microsoft Silverlight’ from MIX10

I promised someone at the end of my talk that I’d post my code and slides and while
I’m lagging a little behind I’ve finally bundled them up and made them available
for download here:

Slides + Code

Also, as a small note I’m slowly working this blog over to have a “Windows Phone
7 Design Series” look and feel, not sure how well the dark background and light
text is going to carry over or how well my design kung fu will stack up but here
goes.

UPDATE #1: I’m also including the actual session itself here for
your viewing pleasure.  You can either watch it below or
directly on the MIX website
.

UPDATE #2: Several people have asked me for sample code to the
solution that has a Windows Phone and Silverlight desktop application both consuming
the same Class Library.  Well, here it is for your downloading pleasure.

width="640" height="360">
Get Microsoft Silverlight

An Introduction to Developing Applications for Microsoft Silverlight @ MIX10

A quick heads up for anyone that saw my upcoming talk at MIX10. I’m super excited (why do normal excited when you can be *super* excited!) to show everyone the basics of Silverlight so people can begin creating rockstar web and Windows Phone applications. Speaking of the basics I want to share for anyone that did a Bing search wondering who this Shawn Oster fellow is and what his talk is really about.

My talk, An Introduction to Developing Applications for Microsoft Silverlight, really is an introduction, a 101. Maybe you are a HTML/JavaScript ninja, perhaps you’re just starting out, maybe you decided hand tuning assembly had lost its luster, whatever reason if you’re a blank Silverlight slate then this is the talk for you. On the other hand if you know about this crazy concept called XAML or have the basics of wiring up event handlers and doing a little data binding then this talk is definitely not for you.

If you’re hoping for some Windows Phone love then you don’t have to wait too much longer, Mike Harsh and Peter Torr lay down all the Windows Phone specific goods for you in the talks following mine. Think of my talk as a primer for those that need a quick intro to some of the concepts they’ll be seeing later.

MIX is an awesome, information-packed developer/designer lovefest and I’d hate for you to miss out on another track having to sit through 101 information.